Is there some way of applying a multi-material configuration on a per part basis? Looking to group some wood grain direction variations under one material for convenience. Right now, I think I still have to unlink materials and choose the configuration for specific parts, unless I’m missing something…
You can. I’m not sure if this is what you’re looking for, but let’s say you have parts A, B, C and one multi-material that contains sub-materials 1, 2, 3. You can apply the MM to parts A, B, C and if they are all linked together, they will all show either sub-material 1, 2, or 3 at any given time. If you want A, B and C to each show a different sub-material at once, you will need to unlink parts A, B and C.
Thank you for your answer and excuse me for my very late answer.
Yes, that’s the way I currently do things. My problem is that if I need to update multiple nodes in a material I’d have to apply the materials all over again across my model.
Let me try to explain:
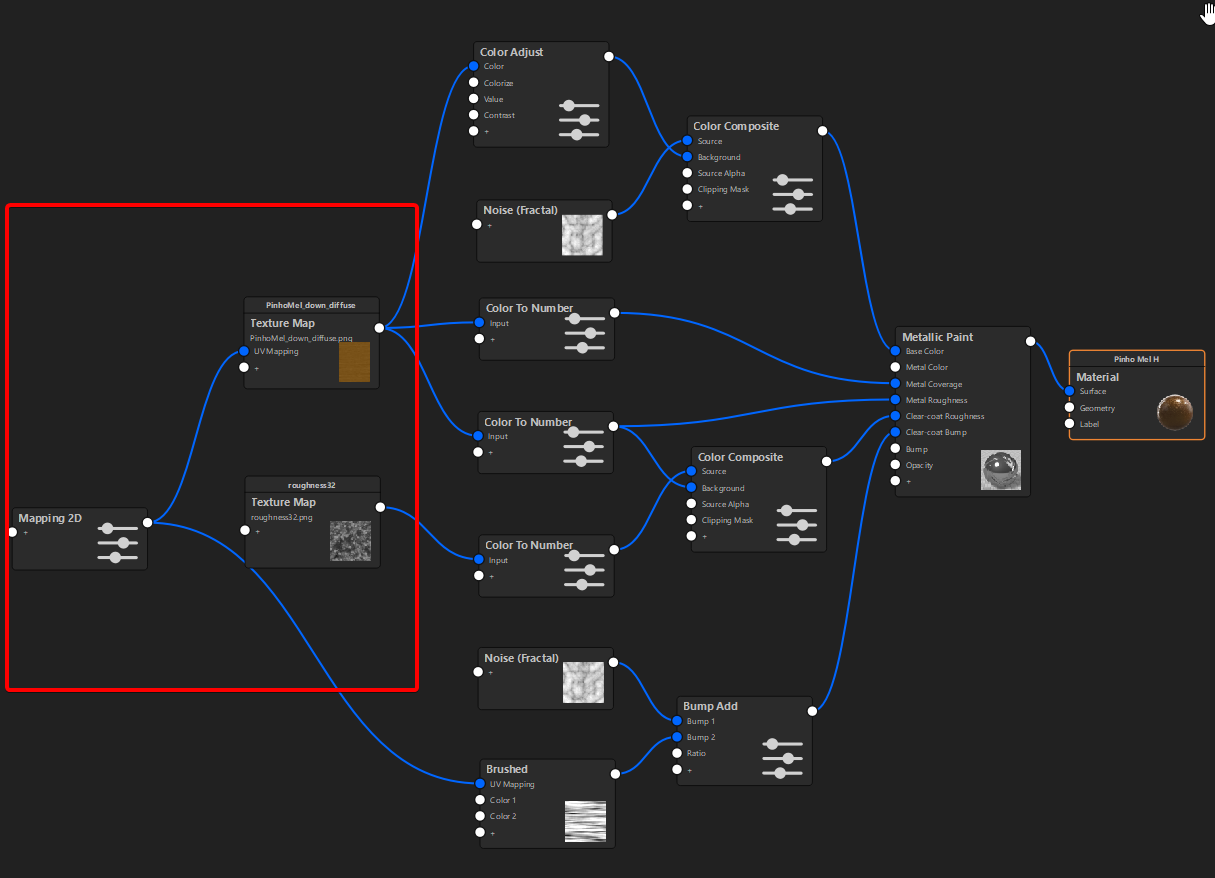
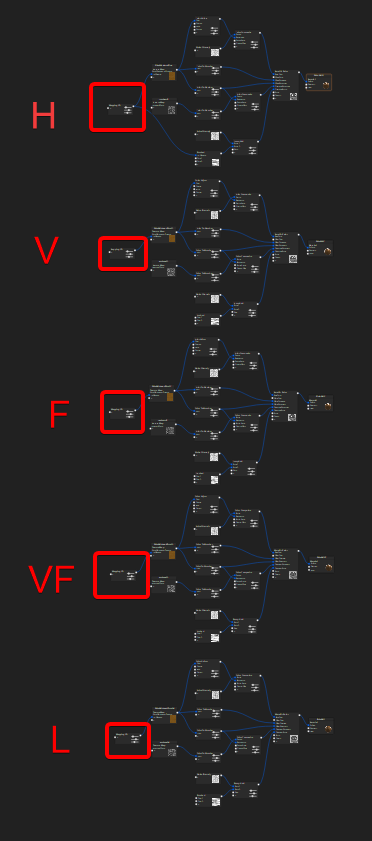
Currently, I have a node setup that eases the box mapping orientation. I find this useful for quickly orienting the grain direction of wood maps and such:
Now, what happens is that I have to setup the material settings fully before committing to the orientation of the various parts. As these are separate materials, if I need to update the appearance of the material, I’d have to go in and update all orientations at once, to maintain consistency.
Up until now, I saved each orientation as a separate material:
Recently I’ve explored Multi-Materials as a way to simplify this process, but I still have to split the material between parts, select the correct Multi-Material configuration for the selected parts and face a similar issue if I need to update the appearance of the material across all parts.
The updating process is now simpler because I just need to copy/paste the nodes across the graph, re-link the 2D Mapping nodes and save the material once:
I was just wondering if I’m exaggerating on my approach, because updating materials across parts with different orientations is tough.
I’m aware of UV Unwrapping as a solution but I have a hard time navigating the window in which we do this in Keyshot, especially when going about drawing seams for large and hallowed objects (think large, very thin, torus like geometry).
I use SolidWorks as my modeling means and I find UV stuff really challenging…
I understand your needs and I wish it could be possible to set one single multi-material and assign MM #1 to part #1 and MM#2 to part #2, etc…
As long as I know, it’s not possible as parts are linked to material and not sub-material.
If it’s ‘just’ a matter of orientation and as you work on solidworks, a solution could be to save each parts of your furniture as a solidwork part with an specific orientation, make an assembly and then on keyshot use the part projection.
It’s a bit of anticipation, and maybe a lot of different files but KS will use the SW parts’ coordinates for your texture, and you’ll need only one material. @will.gibbons did a really good tuto on how model/part projection works on youtube.
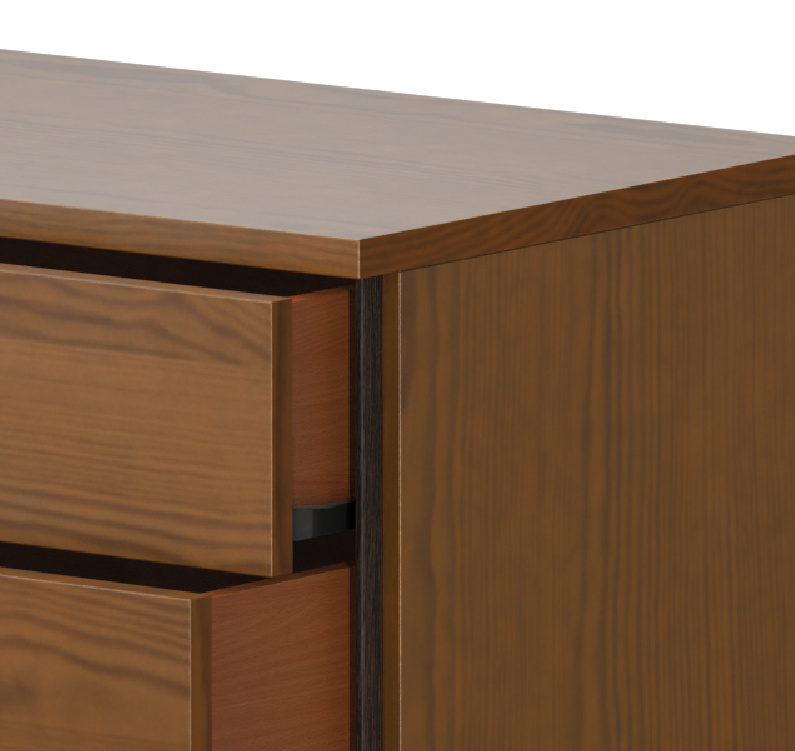
For exemple,when you model your elements on solidworks, always use the X axis for the longest dimension of your wood panels.
I think it’s not possible if you’re working with a single solidwork part file with multi body elements inside.
Hope it would help you. And if someone knows how to apply different sub-materials to different parts, I’m really interested.
Unfortunately, since I model with a Top-Down approach, I can’t really control the axis orientation of all the parts in assembly.
I also save them as parts so that they can become self-contained, reference geometry for rendering purposes, for instance.
I really hope this becomes an option in the future, it could create a very comfortable workflow.
You’d also need to be able to plug more than one 2D Mapping node to a texture though, to keep the node graph lean and free from repetition.
I personally think probably the most efficient way to approach this, especially if you have many different variations, is to probably UV Unwrap the parts so the orientation is correct. This would certainly make setting up the model a much longer in process, frontloading a lot of the work, but once the UVs are setup, you could just use the UV’s as the material projection method and the alignments would be correct. This makes it so you can link the objects together with the same material and the UV Unwrap work would take care of the positioning and orientation.
I never use multi-materials but I think I understand the issue.
Since UV-unwrapping can indeed be a bit hard, what if you split all object surfaces so you basically have the surfaces with a vertical grain and the ones with a horizontal grain.
That way you’ve base materials based on the orientation of the wood grain. The thing is that you might get troubles with different scales of the grain and I think the only thing to keep the scale of the grain right you either need UV maps or split the object surfaces to more groups/materials so you have different sizes.
It’s a bit thinking out loud… maybe of no use but thought how you could avoid the UV unwrapping. Which you can do in other tools as well but it’s a bit of a puzzle and can be frustrating if you’re new with UV unwrapping. Still not my hobby.
Even if I split the surfaces, I still need a different set of materials for each orientation, right?
It’s just a hassle having to update multiple materials when the only think you want to change is the 2D Mapping node.
Makes me wish we could have one of these options:
Node groups: that we could easily copy around the graph
Node clones: so that we could keep a sincronized copy of a node or group (see what I did here?) and link up other nodes as needed;
Multiple mapping nodes per texture: In a multi-material, if I could plug multiple 2D Mapping nodes to one texture map this would solve my issue. The hard part could be implementing per multi-material configuration nodes, since the only one that’s checked IIRC is the Material node.
I could see myself learning to navigate Blender just to map some geometry, but I’d probably have to convert it to some other format and lose NURBS and Live-Linking .
If navigating in the geometry window wasn’t so cumbersome i’d definitely be up for UV mapping simple shapes in Keyshot.
The nice thing are the simple geometry come automatically unwrapped in Blender. Blender has a bridge to Keyshot as well that has similar features to live linking. You just have to sent updates manually to Keyshot by going to the tab and clicking update Keyshot.
My idea was that if you split surfaces based on the angle of the wood grain you would basically have two materials. If you have like horizontal and vertical orientation of the wood grain.
I’m not sure how long it would take or how many objects there are to get an idea of how much work a multi-material workflow still is. Else you could also try a completely different approach and use for example Substance Painter.
Substance Painter is like Photoshop but smarter. It can do automatic UV-unwraps and you could just have one object and create folder layers for each material. Substance Painter will create the right textures and in KeyShot you could just swap them to point for example to the ‘oak.sp’ or ‘birch.sp’ folder.
I think, but you have to try, that Substance Painter is smart enough to keep the wood grains like they should be. And if not I’m sure there are people who created a smart material who does.
But what’s most efficient depends a lot on how many objects there are and how many materials and the time it takes now in KS.
About losing Nurbs, basically that’s something you can’t really avoid. I know that’s not what people like to hear but it’s the same if you would like to present the furniture in a online 3D viewer. And if you want detailed textures you can’t really get around the UV textures as well although it’s super handy KS supports labels which sometimes is enough.
I agree the UV editor is in a cramped up space which makes it very hard to use. But you don’t need KS to create UV maps. You could also just throw your CAD models to someone who likes doing UV-Maps (they exist) and use those for renders. It’s always a puzzle to find out what works best in a certain situation but it’s often worth the time investment because you sometimes save time real easy by changing some of the 3d/production pipeline.